Translate

Showing posts with label bread. Show all posts

Wednesday, November 28, 2018

Mexican Sweetbread Tutorial or Pan Dulce or Conchas!

Hello, everybody!  I have a recipe for any fans of Mexican pastries, and those of you who haven't tried any yet.
                                           
Snagged this photo from Pinterest, says it's a bakery in Los Angeles called Pan de Vita, but really it could be from anywhere. If I'd thought ahead, I would have included a photo from our local tortilleria/panaderia. Rows and rows of these, and nary a chocolate chip cookie in sight. My kids just love this stuff so my husband takes them down most every Saturday morning or even a Wednesday evening. Me? I like it well enough when it's dipped in hot coffee. It's just not my preferred Mexican pastry.
"And what is?" you ask. Why I do happen to have one available so I'll put up a pic. This is also under the banner of "pan dulce" but it's very light and airy... and a lot more sugar. LOL. Just the American in me. I can't go from doughnuts to pan dulce and not notice how much less sweet they are.
So, let's start. The bread isn't very sweet, despite the name, so sometimes if I'm out of eggs, I'll just substitute any bread recipe that starts with warm milk, oil and a little sugar. 
Ingredients:
1 cup milk
6 TBS butter
1/3 cup white sugar
1 package dry yeast
1 tsp salt
2 eggs
 5 cups flour
TOPPING
1/2 cup white sugar
2/3 cup flour
4 TBs butter
So, heat the milk and butter in a pan until the butter is melted. Set aside to cool. Add the yeast, salt, eggs, and flour. Put the dough in an oiled bowl and let rise for one hour.
                                                
Split the dough into 16 small balls and put on a cookie sheet. Start mixing the ingredients for the topping.
                                                   
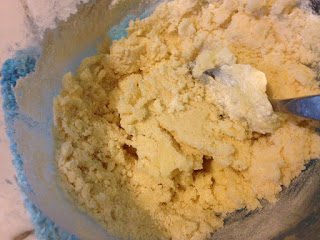
It needs to stick together, but not be too crumbly. This sticks together nicely, but definitely needs more flour. This looks like the beginning of a delicious cookie dough, but it shouldn't be that sweet.
                                    
This is crumbly, but I can still pat it into a disk.
                                                
Place a small disk of the topping on each roll. (Most people dye the topping different colors but we were out of food dye and since it doesn't change the flavor... Oh, well!)
                                     
Take a knife and slice diagonal cuts into the topping. This style of pan dulce is called "las conches", because it looks like conch shells. 
Put in a warm place with a damp towel and let rise another hour. Preheat oven to 350F
                                               
After they've risen again, you can see the distinctive pattern emerging. Sometimes my teens cut different shapes into the topping but I'm not that creative! 
 After about 15 minute you can check on the bread. It might take another few minutes but you don't want to overcook them.
 Mmmmm, hot out of the oven pan dulce y cafe con leche. LOL. Or if I left off the topping it would just be brioche avec un cafe au lait, but let's not talk about that. My kids are convinced it's PAN DULCE and nothing can change that.
 So, if you're a fan of sweet breads, but not too-sweet breads, this is a recipe that's quick (except for the rising and hey, we can all go watch TV or something) and easy.
Take some pan dulce and coffee on your way out, and I'll see you all again next weekend!


Tuesday, November 27, 2018

Fougasse, a crusty bread for your Fall soups

Hello, everybody! The Fresh Pioneer is back and January is in swing over here in Eastern Oregon. This means cold, overcast weather. It snowed a few times but not enough to really play in, so if we want to sled, we have to drive up into the hills.
 Meanwhile, we had our traditional tamale making, and invited lots of people over for the eating part. Even though tamales freeze okay, we made a double batch so we had at least a hundred of three different varieties. Party time!
Bu now that the holidays are over and the cold weather is still hanging on, my thoughts turn to soup (like Missy's butternut squash soup, or Jan's tortellini soup which I made on Monday). But with soup, I always like a nice crusty French bread. My second oldest, Ana, is our bread maker and although she makes a great baguette, I was craving something I ate many times in France.
Why do I post pictures? Mine never look anything like this. Anyway, this is from the the goodfood website. I didn't use their recipe, though, since I already had one in my head. (Surprise!)

This recipe takes almost no ingredients but it takes almost all day to make. It's not a quickie or a crock pot type dish. Which is why the flavor is unique. There are quick flatbreads out there and some focaccia breads that only take about 30 minutes rising time, but this recipe is a multi-step process for a reason. You can't fake this kind of flavor! So, if you love artisan bread, try this one out. It's perfect with a hot stew on a cold winter's day.

Besides the bread, there are usually some additions like ham, bacon, onion, chives, goat cheese, etc. I had onion and some ham slices. It'll do.
 Chop about a cup of onions. If you like a lot of onion flavor, make the bits largish. I have little ones who don't like onion as much so I minced it.
 About a cup of bacon or ham or what have you. I thought I had sun dried tomatoes but I guess I used them up! Tragedy.
 Sautee these in a pan for a few minutes with a little olive oil until the onions are carmelized and the ham is cooked. 
                                      
Mix 1/4 tsp yeast, 2/3 cup water, and 1 1/2 cup flour together and mix well. Place in a warm spot with a towel covering for FOUR HOURS. (No, really. And the first time I made this a few days ago, the dog knocked the bowl over onto the floor, which I didn't realize until I went to check on it three hours later. I had to start over and it was a seven hour wait to step three, haha.) So, set a timer and carry on with your day until it goes off (or your kids remind you that you're in the process of making bread).
During the four hours, the bread will rise and fall (like Rome). Put down that fiddle, Nero, and add 1/2 cup olive oil, 1 1/2 cups flour, 1/4 tsp salt and 2/3 cup water and knead for about five minutes. Now place the bowl in a warm place (away from the dog) and let it rise for about an hour. We don't want it to fall this time, so if you have quick rise yeast, check on it periodically.
 When it's finally risen, it should look like this. It's all right if the top is a bit crusty. That will mix in just fine.
 Add the ham and onion (or whatever you've prepared for the flavors) and mix very well. It will take a while to get it incorporated since there's a lot of olive oil now. Separate into 3 inch balls.
You should get something like this. Hmmmm.... Interesting.
 This one looks a little more tidy.
 Squash it flat with your palm and make cuts into the bread. The family I stayed with in France (when I was out of school, during the breaks) lived in the North. (The village is called Verbiesles, but my school was in Chaumont. It's funny... with Google street view, I can actually "walk" up and down the street in front of my friends' house. Isn't that hilarious? They said the Google view of my house is only from up in the air, so apparently, street view Google has made it to their little village sooner than they've made it to mine.) Anyway, their grandma was from Provence. I think there are Northern versions of this to look like trees, but she made hers like leaves, so that's what I'll do. Fougasse is traditionally baked to test the heat of the wood fire ovens before they put in the larger loaves (no thermometers on those things).
 After you've made the cuts, leave the dough to rise AGAIN. (You and this dough are best friends by now. It's going to be a shame to eat it after all the togetherness you've had today.) Preheat the oven to 450F after 45 minutes. In another fifteen, the dough should be ready. Use your fingers to spread out the cuts so there are more gaps. This helps the bread become crusty and separate easily when you take it out of the oven. Brush on olive oil, herbs, (chopped tomatoes if you want) and sea salt. (It should be a little more separated, but such is life. It still tastes yummy.)
 Right out of the oven! Your house will now smell like an artisan boulangerie.
 I'd made a simple carrot, garlic, sausage, crushed tomato soup earlier that day and it was time to add some fresh spinach, let it cook a few minutes and take it off the stove.
 I know spinach is an acquired taste  and in the summer, it's a constant source of complaint, but nobody seems to mind it midwinter.
My camera was fogging up from the steam so I decided to put it down and eat! I hope you all enjoyed the process of making traditional fougasse from start to finish. 
Until next time, stay warm and eat good food!

Marmalade Bread Pudding

Hello, everybody! I think we've done bread pudding here before but this is a fun twist on an old favorite. Warning- this is not diet food! This is something you make when you have twenty people coming and want a back up dessert. This is not the dish you make when you're going to be home alone all weekend. (Not that I've ever been home alone... in 16 years, but just in case! I'm reminding myself!)
So, our ingredients for the bread pudding:
one loaf of brioche (I was too lazy to make my own so I grabbed some sweet bread from the store)
5 eggs
2 cups milk
1 stick butter
1 cup good marmalade
Seasonings:
1/4 tsp nutmeg
1/2 tsp cinnamon
1 tsp vanilla
Slice the bread thickly and lay in the dish.
Slice the butter and lay it on the bread. At this point I was thinking, "This can NOT be good for anybody." But I think that's the point, really.
Set oven at 350F.
Layer the bread, slightly overlapping, butter slices on top.
Mix milk, eggs, seasonings, and vanilla in a bowl.
Pour over the bread slices. Chill in the fridge for four hours, so the bread soaks up most of the liquid. And now at THIS point I was thinking, "This will never be edible." It looks like twenty bucks of fine ingredients wasted, honestly.
Bake the pudding for 40 minutes until everything is turning brown. Your house will smell delicious, btw. Now, spread on the marmalade and put it back into the oven for another 15 minutes.
Let it cool for five minutes and meanwhile, whip some cream to put on top.
The final product.... was AMAZING. I shared a slice with one of my older kids and it was truly the best way I've consumed worthless calories in a long time. A really incredible combo of spices, warm pudding, fresh cream, and unmistakable marmalade. Those are just not flavors you can fake.
We had guests over that night and the verdict was unanimous: a winning recipe! I think this will be a new yearly Christmas/ New Year tradition for our entertaining schedule. It was easy, unique, and great "holiday" flavors!

  I hope you all are having a wonderful end of the year! Until next time!

Downeast Maine Pumpkin Bread

Hello, everybody! The Fresh Pioneer is back and it's that time of year when I repost my FAVORITE pumpkin bread recipe ever. So, without further ado, here it is from 2014. I made a batch just this last week and I'm making it again this evening. I love sharing this with neighbors and friends, and it has never failed me!
                                                  
  I'm SO excited it's October! I've got great new projects lined up, the kids are just getting over their first cold of the season (as opposed to starting their first cold of the season) and I LOVE FALL. 
So, here's my go-to "welcome to Fall" recipe, Downeast Maine Pumpkin Bread. (Don't ask me about the Maine part. I think I stopped in there when I was young, but I don't really remember it. So, in my mind, Mainers sit around and eat this all day. Lucky ducks.)
 
 Super bright picture of our garden pumpkins! My husband grew a great batch of calabazas this year. In his mountain town, they're serious about growing enough to last through the cooler months. Great vitamins, easy food source.
 Big pot. (Ha! I see my polka dotted shirt. I love polka dots. They're so playful.)
 Someone just brought me a flower.
 So, boiled for about 30 minutes on high, carefully cut away the pumpkin from the skin. It should be really soft. Pie pumpkins are different that the carving pumpkins. Sweeter, easier to cook. Not as stringy.
 Mr. Ninja takes on the cooked pumpkins. Ten seconds. BAM.
 Mmmmm. The first batch was eaten up right away. Cinnamon, sugar, hot from the pot.
 BUT I wanted to make pumpkin bread, so we repeated steps 1-4... except the eating part. One pumpkin gives about two and a half cups of pumpkin. We usually boil about 3 pumpkins at a time so we have some to eat and some to freeze.
  • 2 cups of pumpkin


So, this is all I have of the process. You'll just have to imagine it. Mix the dry ingredients in a bowl. Mix the eggs, pumpkins, oil, water, and sugar. We also added a cup of walnuts.


Ta-DAH! Of course, this is doubled. Your recipe will either give two small loaves (one to freeze!) or one fat loaf like that above. Now, these are the original, but we also added chocolate chips to a batch. YUM. And then we added a cup of walnuts, a cup of chopped green apples and some golden raisins to another batch and it was like the ultimate Fall bread.
  That's all for now! Have a wonderful weekend!

Blackberry Zucchini Bread

 So, a few weeks ago I mentioned blackberry zucchini bread. Here it is! Easy peasy. We got this shredded zucchini from a neighbor, so it doesn't have the skin. (We usually leave the skin on. But the skinless looks prettier in this loaf anyway so...)
 Blackberries from along the river. There weren't many this year. SO SAD.
Now, the recipe is something written down on a stained notecard so I'm not exactly sure where it's from. It looks like my friend Eleanor's handwriting so I'm assuming it's a family recipe. She didn't really work from cookbooks. 
 Ingredients:
3 cups flour
1 tsp salt
1 tsp baking soda
1 tsp baking powder
2 tsp cinnamon
3 eggs
1 cup vegetable oil
2 tsp vanilla
2 cups white sugar
1 1/2 cups shredded zucchini
1 cup blackberries
 Mmmmmmm. Fresh from the oven.
I love the moistness that the zucchini gives the bread. Of course, that might be the 3 eggs and cup of oil, too. :D But anyway, it was a delicious combination and now on our rotation of baking favorites! I'm curious if it would be as good in banana bread, but I'll have to wait until next year because our blackberries are gone. 

Until next time!