Translate

Showing posts with label tutorial. Show all posts

Wednesday, November 28, 2018

How to Clean A Crab

Hello, everybody! The Fresh Pioneer is back and I mentioned last week that it's crab season on our coast. We're not near the coast at all (about 7-9 hours, depending on the route you take, highway or back road). So we don't usually eat seafood because by the time it makes it here to the other side of the state, it's not really as fresh as I'd like it to be. And you know I'm all about fresh food! (Oregon is 98,000 square miles and ranked 9th largest.... way behind TEXAS, of course!) 
 So, these babies started showing up in our grocery store by the mountain. Glorious, cheap, crabs! And although the seafood assistant will crack and clean them for you, my twelve year old boy loves that job. (Ah, twelve year old boys are the best for the dirty jobs. They look forward to them!) Another reason we keep our crab cleaning skills up is for our yearly beach visit. Seafood is cheap there but it's usually sold in the outdoor market. They don't hold your hand as you pick out your dinner, and they don't clean it for you. We've bought tuna, etc. right off boats in the harbor. We also have a year's fishing license, and then when the tide is low we pull mussels off the rocks, dig for clams, or hang a crab trap off the pier. I know you can just buy it in a restaurant and that's absolutely a fine way to proceed. BUT if you lay awake at night wondering if your family would survive the zombie apocalypse, or like to prepare your own food from scratch, keep reading!
                                            
So, let's begin! When crabbing, make sure to follow the local rules and regulations. That usually includes size and sex (nothing under a certain size, and no females). This is a male and you can tell by the shape of the "apron". Males usually have a shape somewhat like the Washington Monument. And females are shaped like the US Capital dome. (Baby females have a sort of triangle, and are probably too small to keep.)
 Using a knife, pop open the apron and pull down.
                                                 
Flipping the crab over, grip both sides of the carapace and remove the top.
                                              
Inside you can see the gills, the innards, etc. Some people save the top and serve the crab dish inside. If you want to do this you'll need to scrub it really well with soap, and then leave it in the sun to dry, preferably for several days. We just toss ours. :)
                                              
Inside the middle is a yellow gunk called "crab butter'. This is like the crab's liver and filters the toxin from the system. Some people carefully collect this and use it in soup or the crab dish because it's a very strong flavoring, like anchovy paste (but not as salty). I've had dishes made with crab butter and although it's good, I don't feel comfortable eating something that filters toxins so... I discard this. Of course, I don't eat liver, either, which plenty of people feel is perfectly okay. It's really up to you whether you feel it's safe to eat/cook with.
                                
Another shot of the gills, crab butter, mandibles. All this should be removed.
 At this point, you can easily crack the crab in half. Take each half and rinse under warm water.
 You can either serve it like this, half a crab for everybody, or you can continue cracking the legs/pincer, remove the meat and use in a recipe.
I hope you've enjoyed my crab cleaning tutorial! Ok, until next time, everyone!

California Sushi 101

Hello, everybody! We were craving fresh sushi and since we live in the middle of verifiable nowhere, we have to make it ourselves. I decided to take some pictures in case anybody has enjoyed sushi but thought it was hard to make. It's really, really not. Plus, it keeps in the fridge for several days, and the ingredients are great for families on a budget. I first made sushi in college and my kids have grown up making sushi rolls at home. We've experimented with a few different kinds, but we always come back to California rolls. 
We like the fresh ingredients. No raw tuna, here! Or maybe it's just easier to find the various veggies and such.
So, let's start!
A pack of sushinori seaweed sheets, rice vinegar, and good quality rice. All of these can be found in your local grocery store. (I'm positive. Really. If WE have them, YOU have them. Unless you're a one stop-light town. We're a two stop-light town and we've got seaweed, and it's certainly not because of our large Asian population.)
Bamboo mats are in most kitchen stores an Walmart and on Amazon. Usually about $6. You don't really need one. You can use plastic wrap or foil, but they do work better. 
We usually use fake crab (because the kids like it better and it's already in the package) but crabs are in season on our coast and this fresh beauty was only $5.99! My son loves to clean them so I let him take care of that part. Maybe I'll post a tutorial on crab cleaning? Hmmmm...
One cucumber, several carrots, fake crab, and avocado. Cut into slices.
Real crab. Mmmmm....
 Mix 12 TBS rice veingar, 9 TBS sugar, and 3 TBS salt in a pot and warm (stirring frequently) until everything is dissolved.Boil the rice according to the directions. Pour the liquid over the HOT cooked rice. This is what gives sushi rice that delicious sweet/sour flavor.
Here's the tricky part. You want each grain coated with the mixture, and how this is achieved is to mix the rice in a folding motion, while fanning with a stiff paper (or a school notebook, as is the case here). You can do it yourself, but if you're not so coordinated, it's always better to have one person fan and the other fold. After about five minutes of gentle folding, the vinegar mix should be absorbed into the rice.
Lay the nori on the mat. Inhale deeply. MMMMM...
So, first step is to cut your nori sheets in half. They should snap apart easily if they're fresh out of the package. 
 Here's the thing... California roll has the seaweed on the INSIDE. Pat rice in a thin layer onto the seaweed sheet. Have a small bowl of water nearby to dip your fingers in or you'll end up with rice EVERYWHERE.
 If you're making a normal sushi roll, the seaweed would stay on the outside but again, it's California roll so we're going to flip the rice over onto some foil that we've put on top of the sushi mat (we don't wan rice in the sushi mat, it's a pain to clean) and build the ingredients into the inside.
 Lay cucumber, carrot, crab, avocado in a line. Not very much because you've only got half a sheet to make the roll. (The bigger the sheet, the fatter the roll.)
                                                         
Roll gently and slowly. It's not hard and with practice, it really takes about 2 minutes to assemble. But I'm uncoordinated so I go slowly.
 Once it's rolled together, carefully remove the foil. (Like a jelly roll!)
                                
They can be wrapped in plastic and put in the fridge at this point. They'll keep for a day or two (probably more) and they're great for bringing to a party, assembling in the kitchen and bringing them out. Lots easier than hauling around platters of sushi.
                                                 
And just in case anyone wants to make the rice on the inside, you can do it really easily an skip thats the of the extra foil and the flipping over.
                                                   
The cutting works the same way, but if the nori is on the outside, it's easier to cut if you dip the knife in very hot water before each cut.
                                                       
Here is a traditional roll (same ingredients, but seaweed on the outside).
                                               
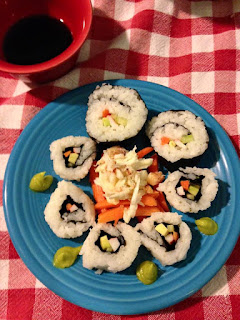
California roll! (But I ran out of sesame seeds, so just imagine a coating of sesame seeds on the outside.) Dip in soy sauce and wasabi for best results!

Take care, have some sushi, and see you all next time!


Tuesday, November 27, 2018

World's best strawberry jam!

Hello, everybody! The Fresh Pioneer is back and this is how we've spent our first few days back from vacation.
A lot of unpacking, cleaning and this.... enjoying the lazy summer days.... and air conditioning.
"I am the master of my fate, I am the captain of my soul." (Invictus, by William Ernest Henley
https://en.wikipedia.org/wiki/Invictus ) Here he is, enjoying the river that is just by our house. We don't get down there much since it's usually too swift for the kids to enjoy, but with all the heat, it's finally at a level they can paddle in without being swept downstream. When we were there yesterday, we also checked on the blackberries. Just a few months until blackberry season!
                                                       
You might remember we paid a visit to Klicker's Strawberry farm. My sweet and talented friend invited me over for a jam making party. (Really, it was a drink-coffee-and-watch-her-make-jam party, but I took pictures so I could try it at home.) I'm sure everybody working in the cafe has made jam, but if any of our visitors wanted to see the step-by-step process, here you go! Believe me, the end result is worth the work!
Mash five cups of strawberries, 5 tsp of lemon juice.
                                                  
Add one pouch plus one more HALF pouch of pectin, plus a teaspoon of butter to cut the foam, and bring to a boil.
                                                            
Add in seven cups of sugar (you can add less if you like and there are some great low sugar recipes online) and boil for another minute. Skim off any foam.
                                           
Pour into sanitized jars to about 1/4 inch from the top. (Make sure the rings and lids have been boiled for a few minutes, too.)
                                            
This picture doesn't do it justice. They are the most gorgeous ruby red and the house smells amazing!
                                                      
Rest on the wire basket of a canning pot, lower carefully into boiling water. The water should cover 2 inches above the jars. Let them boil about ten minutes.
Remove carefully and set on a cloth to cool. The lids will start sealing and you
ll hear them pop. Sounds funny when you have a big batch! If you're not sure if a jar has sealed, press the middle of the lid. If it springs back, it hasn't sealed and you can either use it immediately, or boil again. I can't remember the final number of these little jars she made that day but it was dozens! She sent us home with quite a few, she'll share with family, and then come Christmas, they'll show up in little baskets with biscuits or a pretty mix and a card.
 I love this idea! I think it would be so cute to give couples an anniversary "breakfast basket", with matching mugs, several types of coffee, biscuits or English muffins, and this jam. Here's to the sweet life!


Until next time!

Cherry Blackberry Jelly and a Flashback!

Hi everybody! Weve been having some wonderful fall fun! 
Here's a shot of my little guy (five years old!) on the dirt bike track. I brought a book, but I did more praying that reading. It was SCARY. But everyone survived and had a wonderful time! *whew*
                                       
This is a random picture of the super moon. I didn't even use the zoom. It was JUST THAT BIG.
Here's Mr. Edward at my desk back in 2010. My sister had given me a computer and I spent every nap time writing. I didn't have an office chair so I sat on an old toy box. The desk we got at a yard sale for $10. A steal, even if the drawers didn't really work!  I was finishing up Pride, Prejudice and Cheese Grits while my sixth baby nursed or slept in my arms and the older kids rested in the afternoons. Sometimes I think, "Why did it take me two years to write my first book?" Huh. This is why...
Anyway, I found my then 20 month old "talking" on my mouse. HAHAHA! Kids are hilarious.
Anyway, this post is really about blackberry jelly. If you've ever made it, then you know it's pretty straightforward. Cooking the blackberries with sugar, strain them, add the pectin, maybe boil again if it didn't dissolve enough. Well, my friend in Texas said she always adds about a cup of Bing cherries! She said it adds zip and zing.


I am here to tell you... I have never had jelly disappear so fast. I think there's only one of these little jars left. I'm going to have to make a much bigger batch next time!
  So, if you're a jelly/jam maker, consider adding some Bing cherries to the mix of your fruit. It's a winning combination!

  Take care and I'll see you all in October!!

Happy Easter!! Resurrection Rolls and Yarn Egg Tutorial

Hello, everybody!  Good Friday, Holy Saturday, and EASTER SUNDAY! We've made it! HALLELUJAH!
                                                             But first... rewind....
 
 I hope everyone has had a wonderful Good Friday. We usually attend a Good Friday service at our church where we venerate the cross, meaning everyone comes up and usually bows or kneels at the foot of the cross. It's very solemn and serious. But this year we were invited by our friend Barbara to a retirement center. She wanted to have an Easter concert sing-a-long. Hey, we love to be invited anywhere, so we said "sure".
   Then we had to practice. Most of the songs she chose were hymns we'd never heard before. The youtube clips she sent for us to listen to (and practice with) included Tennessee Ernie Ford and Alan Jackson and Johnny Cash. My kids had NO IDEA who these people were. It was a great education in musical history and gospel hymns!
                                  (Is it just me, or is this a hilarious little statue to have in a nursing home?)

 Anyway, we learned a lot of new songs, sang a few from our tradition (like Lord of All Hopefulness). It was great fun and there was a big turn out. Of course, these older folks already knew the hymns, so we hardly needed to lead. Which was good because the little guys were busy looking at the fish tanks and rolling around on the ground. They were there for entertainment value, definitely. At the end we passed out Easter goodies, in tiny pastel boxes. My husband folded them, the girls and I filled them with confetti, and the boys added the candies. Hm, I wonder where there were hardly any leftover candies??

Something I love about the Easter season is finding new ways to share the Easter story with kids. The sacrifice of the cross is not a warm and fuzzy story, but it's powerful. But how to introduce small kids to it in a way that really helps them remember the sacrifice and God's love for them?

 Food, of course! We all love food, and we usually remember a good dish long after a puppet show has faded from our memory. My friend Christalee sent me this link to Resurrection Rolls.

 
 You take a package of refrigerated crescent dough, roll a marshmallow in melted butter, then in sugar and cinnamon. (The sugar and cinnamon are supposed to symbolize the spices the women were bringing to put on Jesus' body.) You roll up the dough, explaining how they rolled a big heavy stone in front and there were soldiers guarding it. And when the rolls are done, you crack them open, and show them... Ta-DAH! The tomb is empty!

I was wondering a little about the marshmallow melting all over (can you tell I have a very literal child who would wonder why Jesus melted??) and then I realized we could talk about how they only found his linen shroud.
 I also want to make them with PEEPS. (photo above)

The next thing I saw was this awesomely cool Easter egg made out of yarn and a balloon. "Heyyyy, I have yarn and a balloon," I thought. 
I was egged on (haha) by my facebook friends.
 (I am sure they only wanted to see the "nailed it" result but I decided to try it.)
Wellllll, here it is. One bottle of Mod Podge, a skein of pink yarn, and the ruin of one giant green balloon later. It wasn't strong enough to sit upright on a pretty cake platter, so it's resting in a plastic bowl. I already have the giant Easter bunny to go in it bu THE KIDS DO NOT KNOW THIS. They think it might appear there, on Easter Sunday. Or maybe some eggs. They're not quite sure what is going to be in there when they wake up on Sunday morning.
 We'll dye eggs tomorrow and the kids always have a great time... but then we have a bazillion boiled eggs that no one wants to eat. Here's another great recipe for colored deviled eggs. How cute are these?? I'm thinking I'd like a tray of just teal and pink. Or maybe just light green and teal.
 The site's directions are very simple. Basically, proceed as if you're making a normal batch of deviled eggs, but use the leftover dye. (What? you threw it out? Oh, wait... you didn't because you haven't dyed your eggs yet, like me.)

Now you're probably wondering where all the REAL food is, right? (Or not, since we're now the blog that is run completely by people trying NOT TO EAT.) Well, Pioneer Woman Cooks (REEEEEE!!!! I love you!!!!) put up a link to all her Easter recipes EVAH.

You need a ham recipe?
 Here's her glazed Easter ham.

How about the most delicious fruit salad on the planet? I've made this without the vanilla bean and it was just as good!
Or this strawberry sparkle cake! This is what i'm making for my post this next Tuesday. Don't expect it to look anything like this, so feel free to immediately forget this photo. Enjoy it now, but come Tuesday, no LAUGHING when my version is somewhat less beautiful. 

I'll leave you with this steampunk egg by Thierry Atlan, the great chocolatier. Forty pounds, five thousand dollars. Who wants to buy this for my Easter basket??

Have a wonderful Easter everyone! May the joy and blessing of the resurrection touch each and every one of you. As we say in our Easter service, "He is risen! Indeed, He is risen!"